12 Halloween Party Decor Ideas for a Cute, Spooky Celebration
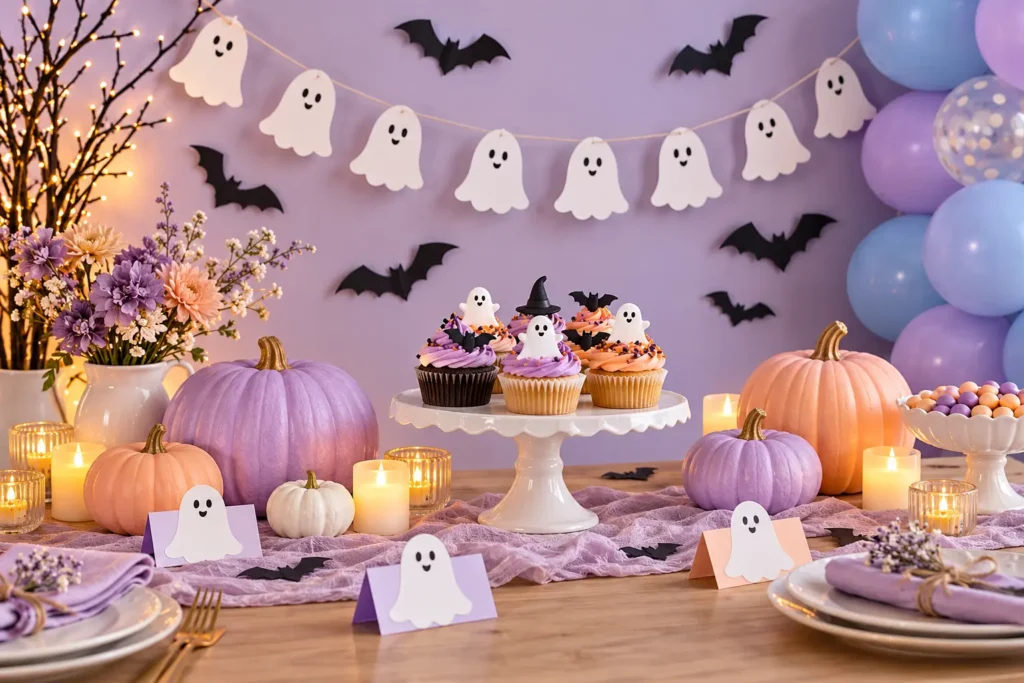
The easiest way to make Halloween party decor feel put together is to repeat one colour palette and one character across a few well-chosen spots. A paper ghost on the invitation, a matching garland above the snack table and coordinating favour tags can do more than a room full of unrelated decorations.
These 12 Halloween party decor ideas work for a cosy gathering at home, a children’s celebration or a playful grown-up party. Choose three or four ideas that suit your space, then build around what you already own.
Start with a Halloween theme you can repeat
Pick two main colours and a neutral before shopping or printing. This makes it easier to use different decorations together without creating visual clutter.
- Cute ghost party: lilac, white and a touch of black, with rounded ghost shapes.
- Classic pumpkin party: orange, cream and black, with pumpkins as the main motif.
- Pink spooky party: blush pink, peach and ivory, with bows and friendly ghosts.
- Evening haunted gathering: deep purple, charcoal and warm metallic accents, with silhouettes and soft lighting.
For a small room, make the snack table your main display. Keep a clear route from the entrance to the seating and food, and leave the remaining walls mostly plain.
12 Halloween party decor ideas to try at home
1. Build one ghost-and-pumpkin welcome display
Place a welcome sign in a frame you already own and group two or three pumpkins beside it. Add a small paper ghost or ribbon in your party colours. A console table, shelf or sturdy stool is enough; you do not need an elaborate entrance arch.
2. Make a paper ghost garland
Draw a simple ghost on card, cut it out and use it as a guide for the remaining shapes. Add different friendly expressions, then attach the ghosts to string with small clips or tape on the back. Keep the spacing consistent so the garland looks intentional. Hang it behind the table rather than across a walkway.
3. Turn a plain wall into a bat backdrop
Cut black paper bats in three sizes and arrange them in a loose upward curve. Fold the wings slightly for depth. Test a removable adhesive on an inconspicuous patch first, and keep the backdrop within the width of your table so it frames the display.
4. Style a dessert table with three heights
Use a cake stand, a medium serving plate and a low tray. Position the tallest item at the back and keep frequently reached-for snacks near the front. A plain cloth makes patterned labels and pumpkin decorations easier to see. Use stable, food-appropriate stands rather than precariously stacked objects.
5. Add coordinating food labels
Fold small cards into tents and add names such as “Ghostly Popcorn” or “Pumpkin Patch Treats.” Put the actual food name underneath so guests know what they are choosing. Keep decorative artwork in one corner and use a plain, readable font for the food information.
6. Create a mini pumpkin centrepiece
Arrange small pumpkins on a tray with a folded cloth or paper leaves. Leave gaps rather than filling every inch. Keep the centrepiece low enough for people to see each other, and leave room for serving dishes. A tray makes the whole display easy to move when dinner begins.
7. Give each place setting a little personality
Tuck a ghost-shaped name card into each folded napkin, or attach a pumpkin tag with ribbon. Repeat the same outline and font across all settings. Let the names be the changing detail; the repeated design is what makes the table feel coordinated.
8. Use a small balloon cluster instead of a full arch
Group a few balloons at one side of the photo wall or behind the dessert table. Mix sizes within your chosen palette, keeping the cluster clear of the food and guest route. For a balloon-free version, use folded paper fans or tissue-paper pom-poms. Keep balloons and loose pieces away from young children.
9. Make a photo corner with two or three props
A plain wall, the bat backdrop and a small basket of paper props are enough. Try a crescent moon, a friendly ghost and a speech bubble. Leave standing room in front of the wall and take a test photo before guests arrive to check that the decorations sit within the frame.
10. Add a decorate-your-own station
Set out paper pumpkin shapes, crayons and stickers on a washable surface. Children can make a picture while adults finish setting up. Keep cutting and hot-glue work with an adult, and display finished creations on a separate board so they become part of the party decor.
11. Finish favour bags with matching tags
Plain paper bags become part of the theme with a ghost tag, a short thank-you message and one ribbon colour. Stand them together in a basket near the exit. Avoid buying lots of extra decorations for this spot; the repeated tags create their own display.
12. Bring the room together with gentle lighting
Use warm battery-operated lights or LED candles to make the party feel cosy without open flames beside paper decorations. Keep lighting bright enough around steps, food and activities. Avoid dangling cords where guests will walk or children will play.
How to use PNG artwork in Halloween decorations
A transparent PNG can sit on a coloured label or invitation without a rectangular background around the artwork. Start with Kikliy’s PNG collection, choose a design that suits your palette and check its dimensions and usage terms before downloading.
- Choose the finished size first. A favour tag needs less detail than a large welcome sign.
- Add one main graphic. Leave clear space for the name, date or message.
- Keep the text readable. Use a decorative font for a short heading and a simpler font for details.
- Check print sharpness. At 300 pixels per inch, a 1200-pixel image prints about 4 inches wide. Enlarging it does not create extra detail.
- Print one test. Check spelling, contrast and cutting margins before printing the full set.
For flat paper decorations, print on suitable card and cut around the design. Ordinary craft prints are not edible; keep paper and ink away from direct food contact. If you want coordinating party details, browse invitation templates or start a design in the editor.
A simple Halloween decorating checklist
- One week before: choose your palette, count guests, check supplies and send invitations.
- Two days before: print a test, prepare garlands and labels, and assemble favour bags.
- The day before: arrange the backdrop and check that tables and display stands are stable.
- Before guests arrive: place food labels, clear walkways, switch on lights and take a quick photo of the finished setup.
If time is short, prioritise a welcome sign, one decorated table and matching favour tags. These three areas give guests a clear sense of the theme without decorating every corner.
Halloween party decor FAQs
How can I decorate for Halloween on a budget?
Reuse frames, jars, trays and neutral tableware. Spend your time on paper garlands, food labels and a single backdrop. A consistent palette makes a small number of decorations look coordinated.
What colours work for a cute Halloween party?
Lilac and white, blush and peach, or orange and cream all work well. Add a little black for contrast, especially in text, ghost faces or bat silhouettes.
How do I decorate a small apartment?
Use one wall and one table as the main display. Choose flat paper decorations, small centrepieces and a compact photo area. Keep doors, seats and walking routes clear.
Can I use the same design for invitations and decorations?
Yes, if its licence allows your intended use. Repeat the graphic and colours, but adjust text size and layout for each item. Do not stretch one finished invitation to fit every shape.
Make it yours: choose one favourite Halloween graphic and repeat it in three places. A thoughtful, manageable setup leaves you more time to enjoy the celebration.